
XQ-S9750TTL: How to Plan a 1000kg.cm TTL Serial-Bus Actuator Network
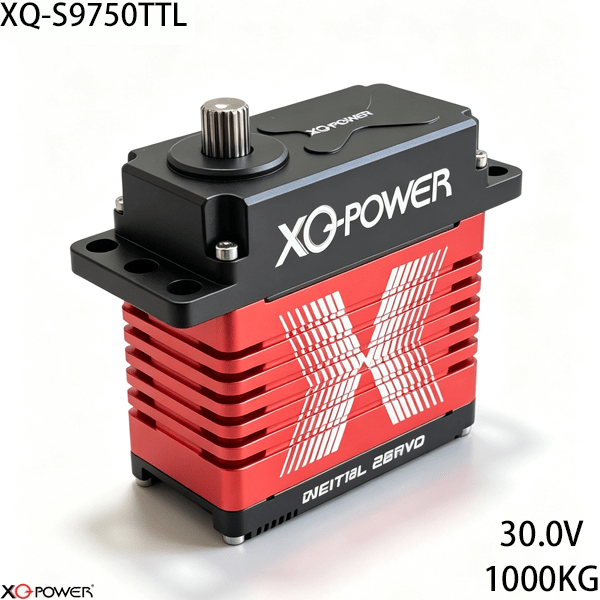
A high-torque actuator becomes easier to scale when the mechanical design and communication architecture are planned together. In a multi-axis robot, the engineering challenge is not only the output torque. It is also how to connect several nodes, assign identities, distribute power, retrieve feedback, and commission every joint without turning the wiring harness into a maintenance problem.
The XQ-S9750TTL is a 1000kg.cm-class industrial brushless actuator designed around a TTL serial bus. The product page identifies 1000kg.cm torque, 0.25 sec/60° response at 30V, daisy-chain communication, real-time telemetry, absolute positioning, a high-resolution sensor, toughened stainless-steel gears, and a full CNC-machined aluminum case.
This article is intentionally different from a catalogue-style product description. It focuses on how to evaluate a TTL serial-bus actuator for a multi-axis robotic arm, heavy industrial exoskeleton, motion simulator, or other high-inertia mechanism, and how to build a repeatable integration and acceptance process.
Start with the multi-axis network diagram
Before choosing cable lengths or assigning commands, draw the complete motion network. The first version of the diagram should show:
- the main controller and TTL interface;
- every actuator node and its unique identity;
- the order of the daisy-chain connections;
- power entry points and cable routes;
- the mechanical joint controlled by each node;
- feedback values required by the supervisory software;
- service access for replacing or configuring one actuator;
- the desired system state after a communication interruption.
A daisy-chain architecture can reduce duplicated signal wiring, but it also makes node order and identity management important. The control team should know how one disconnected or misconfigured actuator affects the remaining motion sequence before the machine is assembled.
Decide when a TTL serial bus fits the application
A TTL serial bus is worth evaluating when several actuators must be addressed by one controller and the system benefits from feedback exchanged over a shared communication path.
It can be a strong fit when:
- multiple axes require individual node identities;
- the controller must read position or actuator status;
- the wiring plan benefits from daisy-chain connections;
- the software team needs repeatable parameter configuration;
- several high-torque joints must be commissioned consistently;
- the machine requires more information than a basic PWM command provides.
PWM may be simpler for a small installation with only a few actuators and no need for node addressing or telemetry. The correct choice should follow the controller, node count, communication timing, cable plan, feedback requirements, and service process.
Create the node identity and parameter record first
Unique node identity is essential in a multi-actuator system. A technician should never have to guess which physical actuator is responding to a command.
Create a commissioning record containing:
- actuator asset label;
- assigned node identity;
- physical axis or joint name;
- direction and travel settings;
- controller configuration version;
- position and feedback settings;
- date and result of the initial motion test;
- replacement and maintenance history.
Use the same axis name on the actuator label, cable label, controller configuration, electrical drawing, HMI screen, and maintenance report. This simple naming convention reduces the risk of applying the wrong travel or direction setting to a neighboring joint.
Plan the feedback model around real engineering decisions
The product page identifies real-time telemetry for absolute position, internal temperature, input voltage, and work load. These values are useful only when the control software gives each one a defined purpose.
A robotics team may use feedback to:
- compare commanded position with measured position;
- confirm that a joint reached its target;
- identify an unexpected change in work load;
- record temperature during repeated cycles;
- check input voltage during simultaneous movement;
- compare behavior among multiple axes;
- support maintenance and fault investigation.
Before using a feedback value in an alarm or interlock, confirm its data format, unit, update behavior, resolution, and failure state in the current technical documentation. A telemetry field should not be treated as a safety function until the complete control system has been validated for that purpose.
Separate motion commands from maintenance data
A shared serial bus has finite communication time. The controller should allocate bus access between motion commands, position feedback, temperature checks, voltage monitoring, work-load data, and maintenance records.
For each axis, define:
- command update interval;
- feedback update interval;
- diagnostic polling interval;
- maximum acceptable response delay;
- priority during coordinated movement;
- behavior after a missed response;
- recovery behavior after a controller restart;
- logging requirements for commissioning and maintenance.
Polling every available field at the highest possible rate does not automatically improve control. Fast motion data and slower maintenance information may need different priorities. Confirm the actual TTL communication format, supported node count, addressing method, timing, and command behavior before finalizing the controller software.
Evaluate 1000kg.cm torque at the joint
The product page identifies 1000kg.cm torque and 0.25 sec/60° at 30V. These are actuator performance figures, not a universal payload rating for every mechanism.
Build a worst-case load model that includes:
- payload mass and center of gravity;
- distance from the output shaft to the load;
- gravity torque at the least favorable angle;
- acceleration and deceleration torque;
- transmission ratio and efficiency;
- external forces and transient loads;
- holding time and repeated-cycle duty;
- required design margin.
A high-torque actuator can still produce poor system performance if the bracket flexes, the linkage is misaligned, or the joint transfers excessive side load into the output assembly. Review the complete force path from the actuator shaft through the adapter and bracket into the robot frame.
Match the 30V operating point to the power system
The product page identifies 30V as the operating point for the published torque and speed figures. A multi-axis power study should evaluate the farthest node while the real motion profile is running.
Verify:
- supply capacity during acceleration;
- voltage at each actuator terminal;
- cable voltage drop along the chain;
- current demand when several axes move together;
- connector, conductor, and protection ratings;
- power-up sequencing and controller restart behavior;
- the actuator state after a supply interruption;
- available margin for future payload changes.
Do not size the power system from idle current alone. A high-inertia actuator network can create a different demand during acceleration, load reversal, holding, and synchronized movement.
Check the mechanical interface with the complete joint
The product page identifies toughened stainless-steel gears and a full CNC-machined aluminum case. These features should be evaluated together with the mounting plate, output adapter, linkage, and driven joint.
Confirm:
- mounting-hole pattern and fastener access;
- output interface and compatible adapter;
- clearance around the actuator body;
- effect of actuator mass on the moving mechanism;
- output-shaft alignment;
- bracket stiffness under the expected torque direction;
- radial and axial load strategy;
- mechanical stops and travel limits;
- service access to the connector and fasteners.
A serial bus can simplify signal wiring, but it cannot compensate for an incorrectly sized bracket or a flexible linkage. Where the mechanism creates significant overhung or side loading, an independent support arrangement may be appropriate.
Commission the TTL actuator network in five stages
Stage 1: Identify one actuator
Connect a single XQ-S9750TTL, assign its identity, confirm communication, check direction and travel, and record the feedback values returned by the controller.
Stage 2: Create the asset record
Link the node identity to the actuator label, physical joint, cable route, controller configuration, and firmware or parameter version.
Stage 3: Add nodes one at a time
Add the next actuator only after the previous node has a documented configuration. Confirm that the new identity, axis name, direction, and feedback values match the commissioning record.
Stage 4: Test coordinated movement
Run a low-speed synchronized motion profile. Check command timing, position behavior, temperature, voltage, work-load feedback, and communication events for every node.
Stage 5: Apply the representative duty cycle
Repeat the test with the final or representative linkage, bracket, payload, acceleration, and holding time. Record bus behavior and power measurements at the farthest actuator.
Compare TTL serial bus with PWM, CAN Bus, and RS485
| Engineering requirement | TTL serial bus | CAN Bus | RS485/Modbus | PWM |
|---|---|---|---|---|
| Multi-axis node addressing | Suited to addressed servo chains | Suited to distributed CAN networks | Suited to register-based networks | Usually requires separate channels |
| Daisy-chain signal wiring | Strong candidate | Depends on CAN topology | Depends on RS485 topology | Signal wiring grows with axis count |
| Telemetry workflow | Bidirectional servo feedback | Message-based feedback | Register polling | Depends on controller and actuator |
| PLC/SCADA integration | Requires compatible interface or gateway | Depends on controller architecture | Natural fit for register-based systems | Requires channel-level control |
| Commissioning method | Node identity and feedback checklist | Node/message configuration | Address/register checklist | Channel-by-channel setup |
This table is a planning aid rather than a substitute for the actuator documentation. Choose the interface that the engineering team can configure, test, diagnose, and maintain consistently.
Frequently Asked Questions
The main reason is the combination of 1000kg.cm-class actuator output, TTL serial-bus communication, daisy-chain connectivity, and real-time telemetry. This makes the model relevant to multi-axis systems that need coordinated nodes and actuator-level feedback.
The product page identifies a daisy-chain topology for synchronizing multiple actuators through a single signal line. Confirm the supported node count, address method, wiring arrangement, command timing, and controller implementation before designing the production network.
The product page identifies real-time telemetry for absolute position, internal temperature, input voltage, and work load. Confirm the exact data fields, units, update behavior, and software interface in the current technical documentation before creating monitoring or alarm functions.
It can be a better fit when the arm has several actuators, requires node identity, benefits from daisy-chain wiring, or needs telemetry. PWM may be simpler for a smaller mechanism with separate signal channels and no network feedback requirement.
That depends on payload, lever arm, gravity, acceleration, friction, shock, transmission efficiency, and duty cycle. Calculate the worst-case joint torque and compare it with confirmed actuator performance at the selected voltage and operating condition.
Start with one actuator, assign and record its identity, then add nodes individually. Verify direction, travel, feedback, and communication before moving to coordinated operation. Keep the final node map with the machine configuration and maintenance documentation.
Provide the axis count, torque and speed profile, supply voltage, controller type, TTL communication requirements, required telemetry, node arrangement, mechanical interface, payload, duty cycle, sample quantity, and acceptance criteria.
Final S9750TTL selection checklist
Before approving the XQ-S9750TTL for a production design, confirm:
- calculated joint torque and required design margin;
- 30V power capacity and terminal voltage at the farthest node;
- controller compatibility with the TTL serial bus;
- supported node count and address plan;
- command, feedback, timeout, and recovery behavior;
- position, temperature, voltage, and work-load data requirements;
- mounting, output adapter, bracket, and side-load strategy;
- representative-load and repeated-cycle test criteria;
- final electrical and mechanical values from the current S9750TTL documentation.
The XQ-S9750TTL should be evaluated as a networked high-inertia motion component rather than as an isolated torque number. Its 1000kg.cm-class output, 30V brushless platform, TTL serial-bus communication, daisy-chain architecture, telemetry capability, CNC-machined aluminum case, and toughened stainless-steel gears make it a candidate for demanding multi-axis robotics. The strongest selection decision will come from a complete load model, a documented node plan, measured power performance, and staged commissioning with the actual controller.